Tin can lanterns are a simple way to add soft light and a handmade feel to a room or outdoor spot. They are easy to make, low cost, and fun to change for your own style.
1. Classic Hole-Punched Tin Can Lanterns

Classic hole-punched lanterns are one of the easiest ways to start. You clean an empty can, fill it with water and freeze it, then tap small holes into the side with a nail and hammer.
When you put a candle or small light inside, the tiny holes make a dotted glow on the wall. This look is simple, neat, and good for porches, patios, and quiet indoor corners.
You can keep the pattern random or make a shape like a heart, star, or flower. This style costs very little because it uses cans you already have at home.
2. Painted Tin Can Lanterns

Painted lanterns add color before the light even turns on. You can use spray paint, craft paint, or chalk paint to give the can a smooth or rough finish.
Bright colors can make a space feel lively, while soft colors can make it feel calm. After the paint dries, punch holes in the can and place a light inside for a warm shine.
This idea works well if you want your lantern to match a room, party, or season. It is also a good way to hide dents or marks on old cans and make them look fresh again.
3. Lace-Wrapped Tin Can Lanterns

Lace-wrapped lanterns have a soft and pretty look. You can wrap lace around the can and use glue or tape to hold it in place before adding holes or cutouts.
When the light shines through, the lace pattern gives the can a gentle, cozy style. This makes it a nice choice for bedrooms, wedding tables, or quiet sitting areas.
You can use white lace for a clean look or dark lace for more contrast. This style is simple to make and does not cost much if you already have old fabric at home.
4. Cutout Shape Tin Can Lanterns

Cutout shape lanterns let you make bold designs by cutting pieces from the can. You can use simple tools to remove small stars, moons, leaves, or even letters.
These lanterns stand out more than tiny-hole styles because the light comes through larger open spaces. The result is a stronger glow that can show up well in a yard or on a front step.
You can make the shapes fit a holiday, a name, or a theme for a party. This gives each lantern a personal touch and helps it feel more special than a plain store-bought light.
5. Rustic Twine-Wrapped Tin Can Lanterns

Twine-wrapped lanterns give a warm, country-style look. You wrap twine, jute, or string around the can and leave some metal showing for a mixed texture.
The rough twine looks nice with the soft light inside, and it works well with wood, stone, and simple home decor. This style is a good fit for shelves, decks, and garden tables.
You can also add a small tag, bead, or charm to make it your own. Since twine is cheap and easy to find, this is a smart choice for anyone making several lanterns at once.
6. Holiday Tin Can Lanterns

Holiday lanterns help you change your space for a season without buying much. You can paint cans in red, green, gold, white, or other colors that fit the time of year.
Add holes or cutouts that match the holiday, such as trees, snowflakes, pumpkins, or hearts. When lit, the lanterns can bring a fun and simple mood to a table, shelf, or window.
This idea is useful because you can store the lanterns and bring them back out later. It also saves money since one can be used in many ways across the year.
7. Garden Path Tin Can Lanterns

Garden path lanterns are made to line walkways, steps, or flower beds. You can place them on the ground or hang them low from hooks or short posts.
The soft light helps people see the path and also adds a calm look to the yard. At night, the glow can make plants, stones, and edges easier to notice.
Try using weather-safe paint and a battery light if the lantern will stay outside for long. You can also make a set in the same color for a neat, tidy look, or mix colors for a more playful feel.
8. Hanging Tin Can Lanterns

Hanging lanterns are a nice way to use space above a table, porch, or tree branch. You can punch two small holes near the top and add wire or strong cord for hanging.
When they move a little in the air, the light can shift in a soft and pleasant way. This style works well for outdoor meals, small parties, and quiet evenings.
You can hang them at different heights to make the space feel fuller. A mix of plain metal and painted cans can also give the area a more modern look without much cost.
9. Colored Tissue Tin Can Lanterns

Colored tissue lanterns use thin paper to give the light a stained-glass feel. You cut or tear tissue paper into pieces and glue them onto the can in a design you like.
When the light is on, the colors glow in a soft and bright way. This can make a child’s room, party table, or craft shelf feel more cheerful.
You can layer colors for a deep look or keep it light with just a few pieces. This project is low cost because tissue paper is cheap and a little goes a long way.
10. Nature-Themed Tin Can Lanterns
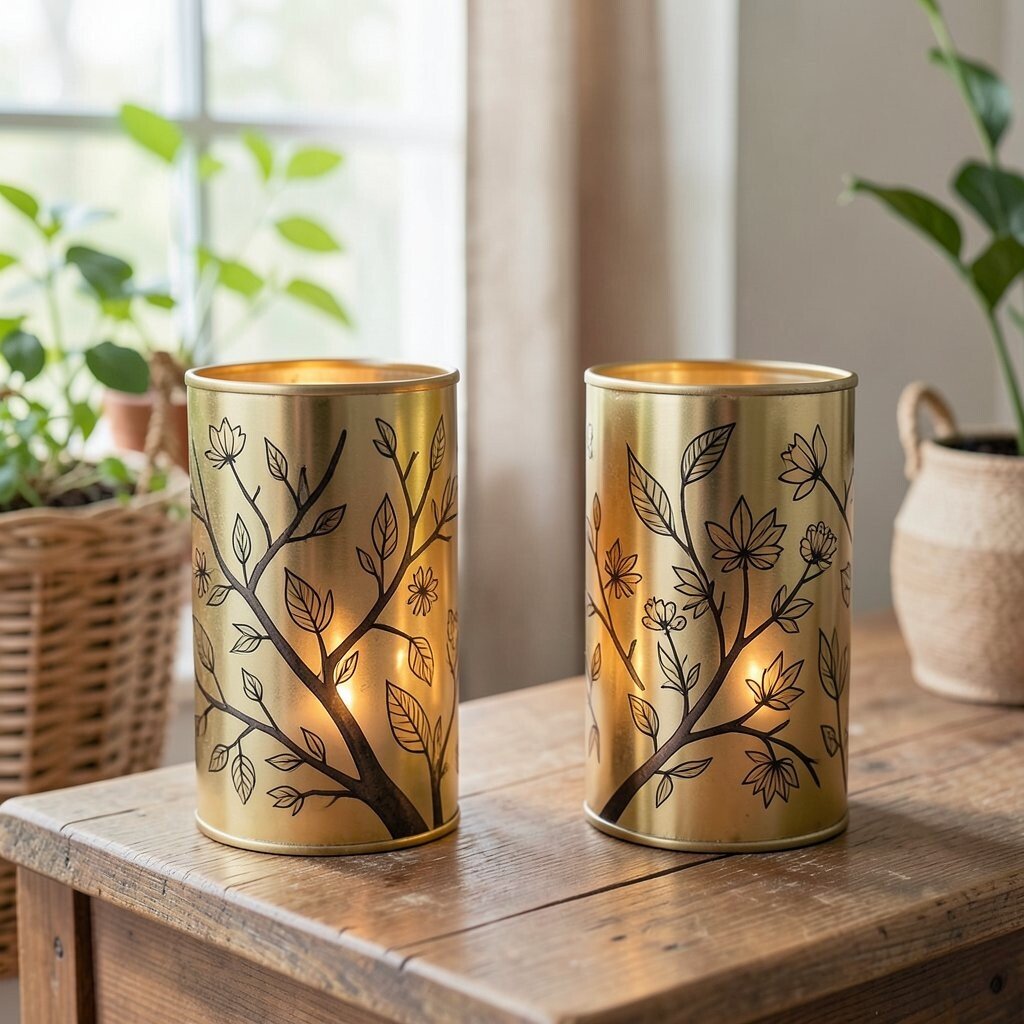
Nature-themed lanterns use leaves, flowers, branches, and other outdoor shapes. You can paint simple leaf lines or punch patterns that look like vines and petals.
This style brings a calm, earthy feel and works well with plants, baskets, and wood furniture. It can also fit a spring or summer space without needing much extra decor.
For a personal touch, try using a pattern from a favorite tree or flower in your yard. Small details like this can make the lantern feel more tied to your home and your own style.
11. Tabletop Tin Can Lantern Centerpieces
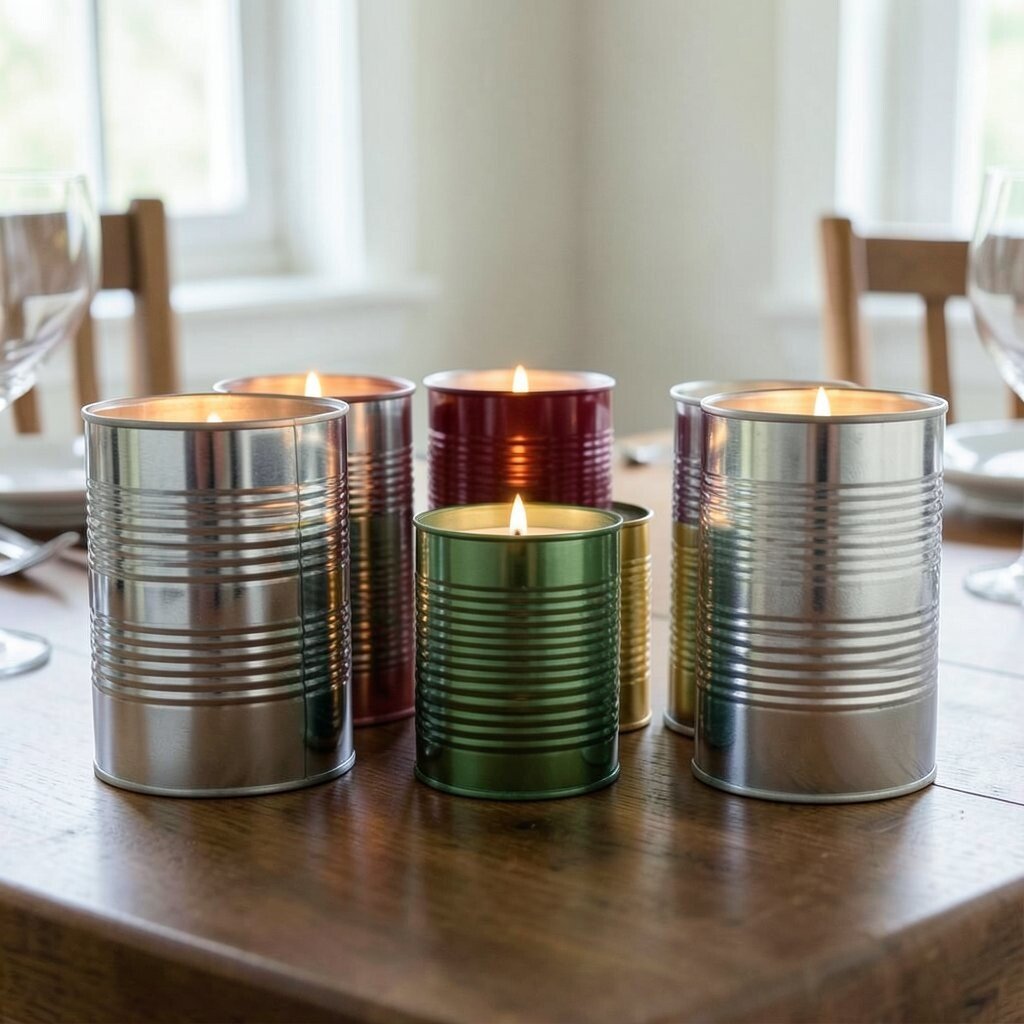
Tabletop lantern centerpieces can help a plain table look more complete. You can group a few cans of different heights in the center and place tea lights or small LED lights inside.
The mix of light and height gives the table more shape and makes it feel planned. This works well for dinners, birthdays, and small get-togethers where you want a simple display.
Try using one color for a clean look or several finishes for a more casual style. Since the cans are easy to make, you can change the set often without spending much money.
12. Personalized Tin Can Lanterns

Personalized lanterns are a great way to make the project feel like yours. You can add names, dates, short words, or simple symbols that mean something to you.
These lanterns work well as gifts because they feel thoughtful without being expensive. You can make one for a friend, a family member, or a special event and still keep the cost low.
For a modern look, try clean lines and simple letters. For a more handmade feel, use uneven holes, hand-painted details, or mixed materials like twine and ribbon.