
Balusters can turn a plain railing into a piece of everyday art. With a little patience, you can make them feel custom and full of personality.
1. Rope-Twist Baluster Refresh

Picture a familiar wooden or metal baluster, then imagine it wrapped with a rope-twist look that catches the light. This simple change can make your stairs or porch feel more detailed without rebuilding anything major.
Start by choosing a rope type that matches your style, like jute for a warm coastal vibe or twisted cotton for a softer farmhouse feel. Lightly sand the surface, then use a strong adhesive to secure the rope in a steady spiral. Once it’s dry, brush on a clear sealant to help it handle normal wear and dust. Finish by adding small knots or tiny accents at the top and bottom so each baluster looks intentional.
2. Stencil Medallion Centers

Turn each baluster into a mini canvas by adding a stencil medallion in the middle. From a distance, the repeated shapes create a clean rhythm that feels planned.
Pick a stencil pattern that fits your decor, like a simple flower, geometric circle, or scrollwork emblem. Use painter’s tape to keep edges crisp, then apply two thin coats of craft paint. After it dries, seal with a matte or satin clear coat to keep the surface looking fresh. For personalization, vary the color on every other baluster so the rail feels lively. Consider cost by using budget-friendly acrylic paint and reusing the same stencil across the whole staircase.
Right now, high-contrast paint pairs are trending, especially dark railings with light accents. If your railing is already bold, try subtle tone-on-tone painting so the pattern still shows without overpowering the space.
3. Mosaic Tile Cap Accents

Small tile pieces can make baluster tops look like they’re wearing tiny crowns. When the sun hits, the scattered colors create sparkle that feels cheerful.
Choose tile scraps or inexpensive mosaic sheets and cut them into tiny squares that fit the top profile. Glue the pieces onto cleaned wood or a tile-ready surface using a tile adhesive that matches your material. Grout lightly if you want classic charm, or keep it simple with a thin, colored grout-style filler. For practicality, seal the cap well so cleaning is easy and water won’t soak in.
To personalize, use a color story from your room, like blues for a bathroom feel or warm browns for a cozy hallway. This craft can fit many budgets because small scrap tiles go a long way, especially when you only cover the top area.
In many homes, mosaic accents are showing up again in small doses, since they add personality without a full renovation. Keep the rest of the balusters classic so the tile work becomes the star.
4. Vintage Keyhole Drip Paint Effect

For a slightly edgy but still classic look, try a drip paint effect that starts near a carved keyhole shape. It feels like a secret detail running down the railing.
Begin by cleaning and lightly sanding the baluster so paint clings well. Sketch a simple keyhole outline with pencil or chalk, then use a stencil or painter’s tape to mark the shape. Apply a base coat, let it dry, and then add paint in thin layers so the drips look controlled, not messy. Personalize by using your favorite metal tone on the trim, like aged bronze, while keeping the drips a deeper color.
5. Herb-Print Transfer on Wood

If your balusters are wooden, herb-print transfers can make them feel like garden art. Imagine delicate leaf lines that look classy but still relaxed.
Use printed herb images or leaf silhouettes, then transfer them with gel medium or a safe transfer method for your craft supplies. Cover the wood with a base coat first, so the print looks smooth and vivid. After transfer, seal everything with a protective topcoat to prevent smudging from fingerprints. For personalization, match the leaf type to your home, like rosemary for a kitchen theme or eucalyptus for a modern spa mood. Keep cost in mind by printing at home and using plain wood balusters or sanding down old ones.
Current trends often favor natural textures, and herb prints give that organic feel while staying affordable. The best part is that each transfer can be slightly different, which makes your railing look custom.
6. Wrapping With Leather Strips and Brass Pins

Leather strips over a baluster can make the whole railing feel warm and tailored. When you add small brass pins, it looks like something you’d see in a boutique workshop.
Choose thin leather strips that wrap snugly around the baluster and decide on a pattern, like vertical bands or crisscross lines. Apply a strong adhesive, press the leather down carefully, and trim edges cleanly. For a sturdy finish, add a few small pins or rivets spaced evenly so the wrap stays tight. Personalize by selecting leather color that matches your decor, like tan for rustic charm or black for a modern look. Cost considerations are manageable because you can buy offcuts and use them only where they show most.
7. Carved Flute Revival With Wood Inserts

Classic fluted balusters have a timeless feel, and you can revive that look even with simple tools. Visualize neat vertical grooves that catch shadows and make the railing look richer.
If your balusters are smooth, consider adding slim wood inserts that create flute-like lines. Sand the surface, measure evenly spaced channels, and glue the insert strips in place. After the adhesive cures, sand again so the inserts blend nicely, then stain or paint to match the railing. This approach adds uniqueness because the spacing can be adjusted to suit your style and hand feel. Practical tips include using a straight guide board when placing strips and sealing thoroughly if the railing is outdoors.
Right now, many people are leaning into “old-world details,” and carved textures are a big part of that vibe. This craft gives that classic depth without requiring brand-new balusters.
8. Chalk-Painted Name Tag Initials

Turn each baluster into a friendly marker by painting initials or short names on the front side. Up close, it feels personal; from across the room, it still looks clean and intentional.
Choose chalk paint or matte acrylic in a color that contrasts with the railing finish. Lightly sand first, then paint one or two letters centered so the placement stays neat. When dry, seal with a clear topcoat so it lasts through everyday dusting. Personalization is easy because you can use a family theme, like wedding initials, house numbers, or a meaningful word. For cost, chalk paint is often affordable, and you can use a small brush instead of buying fancy tools.
9. Sunburst Pattern With Thin Wood Strips

A sunburst design makes balusters look like they’re carrying a little bit of morning light. The visual effect is especially strong on stair rails where you see the pattern from different angles.
Gather thin wood strips, like craft lath or cut veneer, and design a center point on each baluster. Glue strips outward to form rays, then fill gaps with a fine filler if needed. Paint or stain the entire baluster after assembly for a smooth finish. To personalize, adjust ray thickness, spacing, or the number of rays so each baluster feels subtly unique. Cost considerations are friendly because strips can be cut from inexpensive wood stock and used in small amounts.
In home styling, geometric details are showing up everywhere, and sunbursts are a classic shape with a modern twist. Keep colors simple for a current look, like warm white and muted gold accents.
Practical tip: work on one baluster at a time to keep alignment consistent across the rail.
10. Denim Patch and Stitch Look Cover
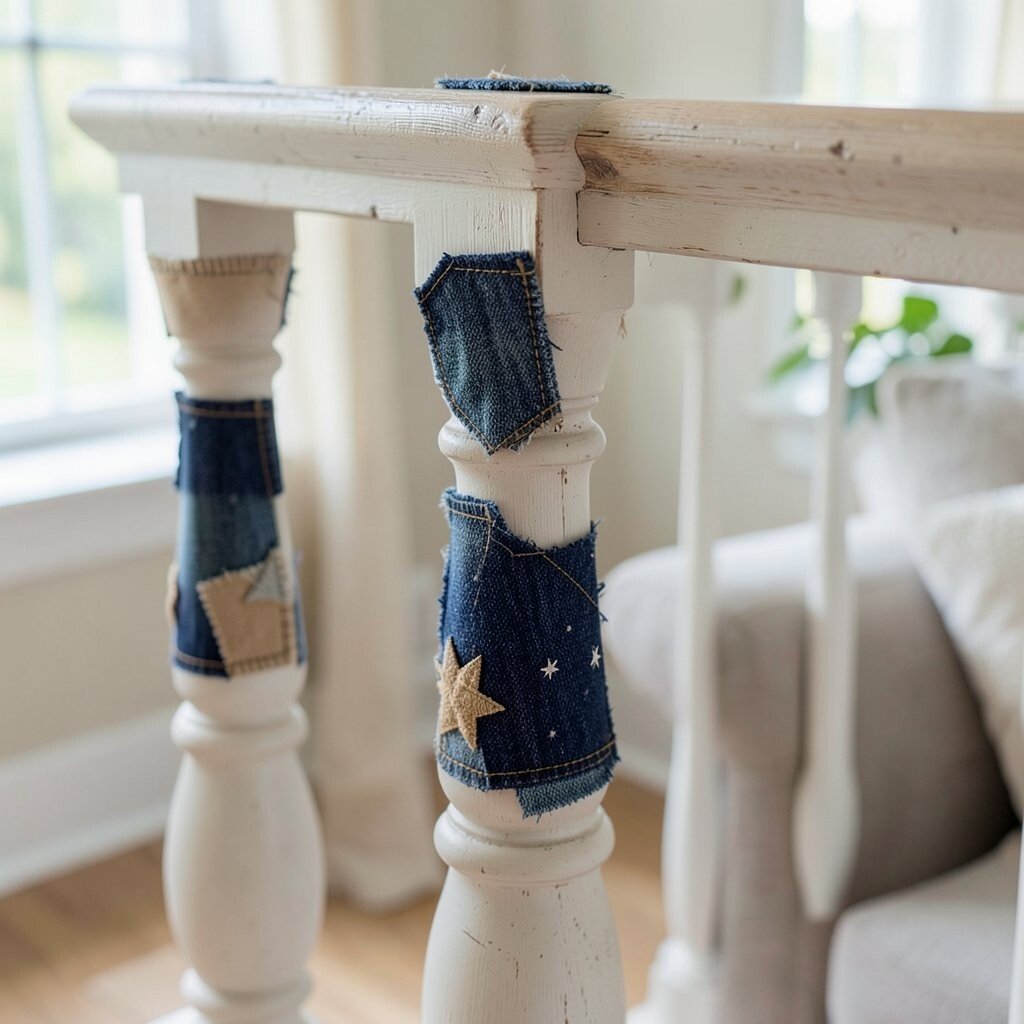
For a cozy, playful vibe, use fabric patches that mimic denim stitching. The railing can feel like a reclaimed farmhouse project, even if you start with something plain.
Clean and lightly sand the baluster, then apply a base coat in a fabric-friendly finish. Cut denim scraps into patch shapes and glue them down, smoothing edges as you go. Add a paint marker line or fabric paint to create “stitching” around the patch. Personalize by choosing patches that match your living room colors, like navy with tan, or adding small appliques like stars. Keep cost low by using old jeans or thrifted textiles.
11. Ceramic Bead Rows for a Classic Border

Beaded rows can add that elegant boutique look, especially along the middle portion of a baluster. When your railing catches light, the beads can shimmer and make the hallway feel special.
Pick ceramic beads that are uniform in size for a tidy line, or mix sizes for a more artsy vibe. Glue a row of beads onto a prepared surface using a clear adhesive rated for crafts, then let everything cure fully. For practical durability, seal around the bead line with a thin clear coat to help it resist dust and minor bumps. Personalization is easy by using beads in a specific palette, like sea glass colors for a calm theme. Cost considerations depend on bead quality, but you can often find budget packs and save by using beads only where they show best.
Right now, mixed-material accents are popular, and ceramic beads fit perfectly with wood, metal, and painted surfaces. Keep the rest of the balusters simple so the bead border stands out.
12. Metallic Leaf Wax Rub on Flat Sides

If you want a classic luxe feel without heavy painting, leaf wax rub can look amazing. It gives a soft metallic shimmer that looks like aged foil.
Use a leaf wax rub kit or metallic wax product on a clean, smooth baluster surface. Rub gently with a soft cloth so the pattern spreads evenly and doesn’t look streaky. Seal with a topcoat meant for wax finishes so you get better protection during cleaning. Personalize by choosing copper for warm spaces or silver for a crisp, modern look. Cost can be kept reasonable because a small amount of wax goes a long way, especially when you only highlight flat sections.
A current trend is subtle ornamentation, where you see texture up close but it stays elegant from far away. Metallic leaf rub delivers that effect and makes even plain balusters feel intentional.
13. Weathered Paint Distressing With Raised Molding

Classic distressing looks like a railing that has lived through stories, even when it’s new. Adding raised molding details makes the weathered finish look even more believable.
Start by attaching slim molding strips to a smooth baluster surface, then paint over everything in your chosen base color. After the paint dries, sand edges and high points lightly so you reveal the underlying layers. Apply a clear wax or topcoat to keep the look protected. Personalize the effect by choosing a two-tone approach, like ivory on top with a deeper base color underneath. Cost considerations are manageable because molding strips are inexpensive, and the same supplies work for many balusters.
In many homes, “heritage style” updates are trending, and this method gives that look in a weekend. Practical tip: test your distressing on one spare piece first so you can control how bold the wear appears.
14. Stacked Spiral Dowels for a Mini Column Look

To create a mini-column vibe, stack short dowels in a spiral arrangement around each baluster. The visual effect is playful but still classic, like a small architectural detail.
Measure your baluster diameter and cut dowel pieces that match the look you want, then arrange them around a spiral curve. Glue each dowel piece in place carefully, allowing spacing to stay even. Once assembled, sand the surface smooth where needed and finish with stain or paint for a unified appearance. For personalization, vary dowel lengths slightly so the spiral feels handcrafted instead of factory-perfect. Cost is usually low because dowels are inexpensive, and you can buy basic wood that matches your finish plan.
This craft fits current trends toward handmade texture, especially in entryways and stair halls where you see the rail every day. Keep a steady rhythm as you work and wipe away glue quickly for a clean, polished result.
Practical tip: use a jig or template so each baluster spiral matches the next one, which makes the whole railing look cohesive.